

These Screenshots Show the Steps to Share iCloud Photos
I’ve grouped them into categories by Tasks. Each section is divided by the faint grey line shown below.
Navigate to Shared Albums on iCloud
Below: 1st Tap on Shared on the bottom menu

Below: Tap on Sharing to get to the All Album’s view.
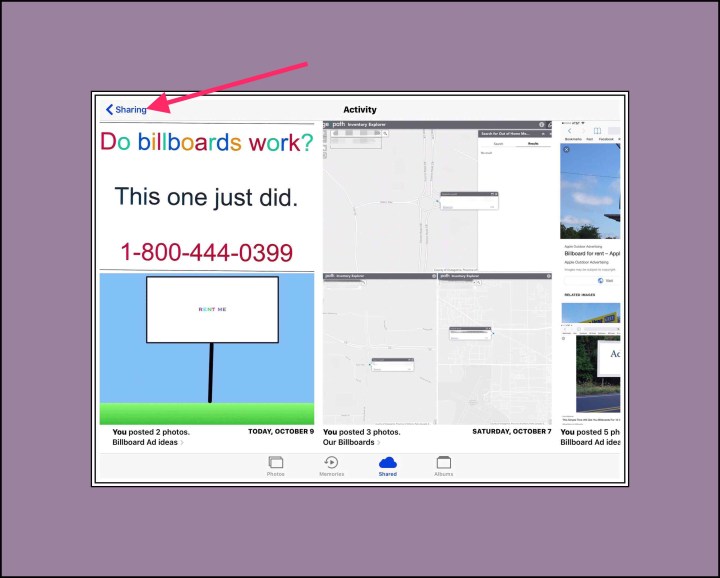
Below: Once you’re at the place where all your shared iCloud photo albums are displayed you can go on to Share an album with someone or add photos to an album.
Adding Photos to a Shared Album
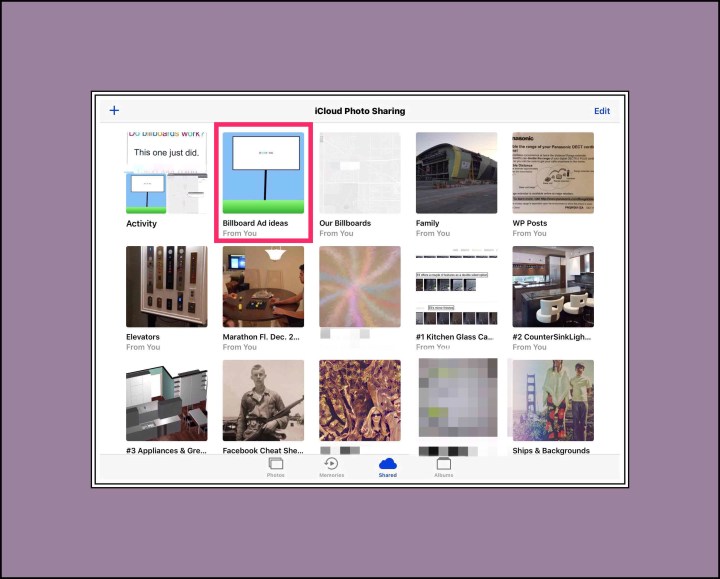
Below: To add a new photo to this album 1st tap on the album to open it and the scroll down to the bottom or the last image in the album. You’ll see a grey square with a + sign in it. Tap on the + sign and then use the bottom Photo menu to navigate to where the images are that you want to add. Most often they are in your Camera Roll…(I know it’s an antiquated term, but it’s more descriptive!) So tap on Albums on the bottom right and then on Photo’s in the top left. See the next screenshot.

Below: This time instead of tapping on Shared as shown below…tap on Albums…to get to your Camera Roll or Photo’s Album on your device.
Sharing an Album
Below: Tap on People and then Invite People.

Below: Begin typing in someone’s name…and Apple will start to list contacts that are similar. You will need to have a person entered into your contacts before you can share this way. The only way to share an album without first adding someone as a contact would be to set the album to Public (which allows you to copy a link to the album) and then copy that link and email it or text it to someone the usual way…outside of the Photo’s app.
But let’s assume the person is a contact…then just select the right one.For most people you’ll see them show up here twice. Once with an email address and one email with a phone #. Select how you’d like them to receive your invitation by choosing between these. If you want to make darn sure they get the invite…chose both.


More Details About Sharing
Below:
- Turning Subscriber’s Can Post ‘On or Off’ dictates whether or not people you invited to share with can also upload photos to this album.
- Turning on Public Website allows you to have Apple create a link that you can copy and paste and use for sharing or keep it in a note or something. While the album is ‘Public‘ and theoretically that means anyone could see it…in practice really only the people who you send the link to will see it. So, you don’t need to worry in most cases that making it public will allow lots of uninvited people to see your album. That ‘s because:
No one else in the world will even know of its existence! Therefore no one would ever know that they should even try to see it. Once you’ve turned this on…tap on Share and then Copy so that you’ve copied the link onto your invisible clipboard, and have it for pasting somewhere else. If you don’t see the Copy menu item, see the following screenshot.
- You can receive a notification every time someone adds something to the album.
- You can delete the album…sometimes Delete isn’t visible at first and you need to swipe upwards on this whole section to get it too appear.

Below: To reveal the Copy menu option tap on the 3 dots and look in the list for Copy. You can change the order by just st dragging Copy up higher on the list.

How to Edit the Name of a Shared iCloud Photo Album

Above: 1st tap on Edit
Below: After the Red -‘s to appear….tap on the Album’s name once to select it, and then again to position the cursor where you want to change it. Or you can just X out the whole title and enter a new one.

How to Rearrange the Order of Photos Within a Shared Album
From what I can tell, this can’t be done. The only way I’ve been able to do it is by downloading certain images that need rearranging and then re-uploading them into the correct order…and then going back to delete all the duplicates. This is a cumbersome process because you can only work with them at the end of the album. So if there are a lot of images in the middle of the album it can get quite cumbersome. I’m still using ios 10 on the device I’m writing this on…if I notice any improvements on ios 11 I’ll update this.

Looks to be a great job – now if I only knew what its all about? Dad
The world is getting to be such a dangerous place, a man is lucky to get out of it alive. W.C. Fields
Website: http://www.etcetra.weebly.com
LikeLike
Dad, people like us who primarily use Apple devices, keep most of our photos in Apple’s iCloud. Luckily since
you use your iPad only occasionally, you’ll never have to worry about this, because you never switched your photo library to Apple’s iCloud. Thanks for visiting me here :-)
LikeLike